Create and Manage Candidate Forms
Unit Administrators can create three types of forms: Candidate Forms (completed by candidates), Committee Forms (completed by committee members), and Case Data Forms (completed by Unit Administrators for additional candidate data). This article explains how to create a new Candidate Form.
Candidate Forms are designed to collect information directly from candidates and are part of their packet requirements. They can be created at any unit level and will be available to all units below it in the hierarchy.
Please note that creating and adding a form are not the same process. Once a form has been created, Unit Administrators must attach it to cases or templates.
Create Candidate Form
- Navigate to the Administration page, click Candidate Forms, and then click +Add Candidate Forms.

- From here you can click the Pencil (Edit) or “X” (Delete) icon to edit or delete an existing Candidate Form.
Editing Candidate Forms
In-Progress Cases: Changes are immediately visible to candidates if they have not submitted the Candidate Form yet.
Submitted Cases: Changes appear on the ‘Edit Case’ page but do not replace already submitted forms.
Recommendation: Add a section to the form explaining how changes to forms affect in-progress and submitted cases to help Administrators and Candidates understand the implications of editing forms.
- From here you can click the Pencil (Edit) or “X” (Delete) icon to edit or delete an existing Candidate Form.
- Fill out the information on the Add New Form window and click Done when finished.

Note that the form will be available for units at or below the parent unit selected.
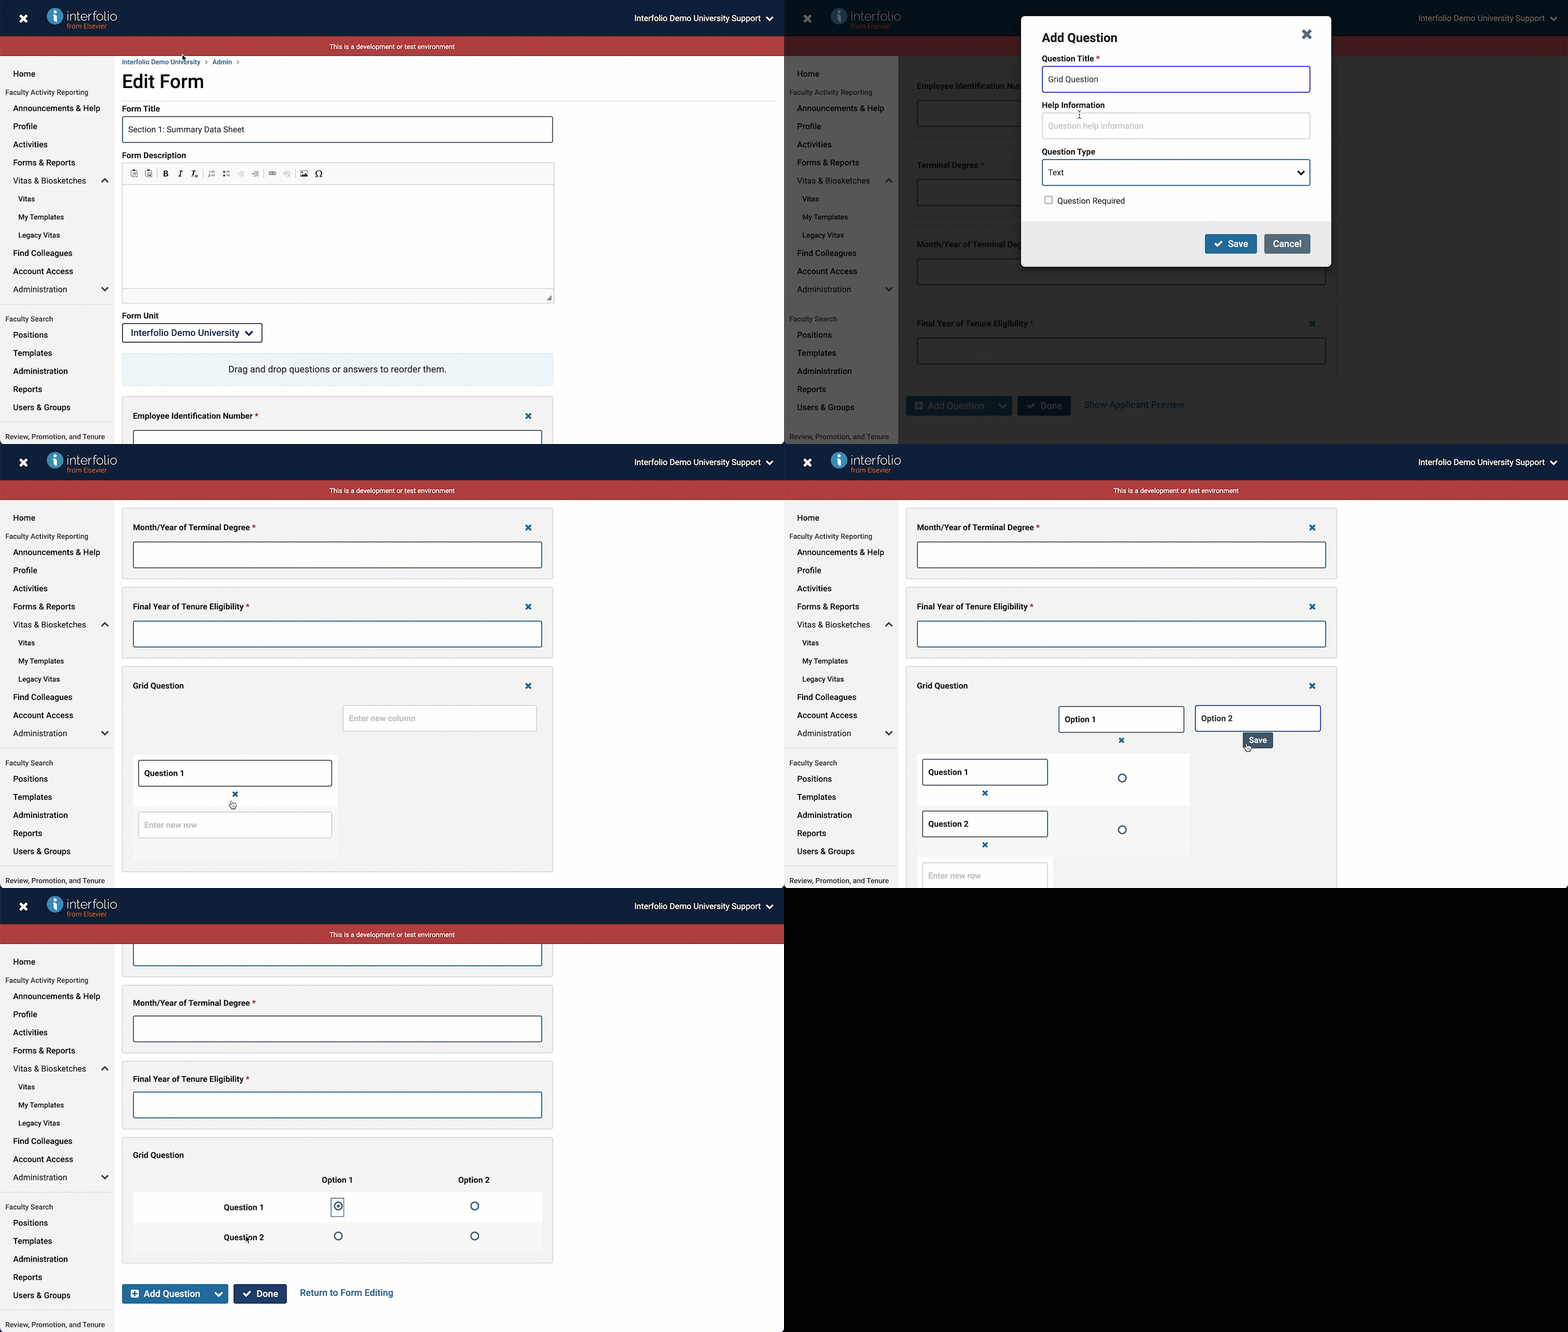
- On the Edit Form page, you can +Add Questions. After clicking this button, the Add Question window will appear.

- Check the Question Required box to require the question to be answered before submitting the form.
Once questions are added, they can be dragged and dropped to change the order in which they appear. Formatting can also be added to customize the form display.
- Check the Question Required box to require the question to be answered before submitting the form.
- Click the dropdown menu beside the Add Question button to select a formatting element. For more complex forms, it is recommended to include these elements for order and clarity:
- Section Heading: A large-text label that can be placed atop a discrete section of the form.
- Section Description: Contextual text that can be tucked underneath a heading and above the actual questions.
- Section Divider: A simple horizontal line that can visually break up the form.
- Repeat this for as many questions as necessary and then click Done when finished.
- You can also click Show Applicant Preview to preview how the form will appear to candidates.
Check out this article on Text Character Limits in RPT.
| Question Type | Details |
|---|---|
| Text Question | Text questions prompt applicants to respond with one line of text. These are best suited for short answer, free-form responses. |
| Paragraph Question | Provide applicants with an entire text box for their answer. Best suited for longer, paragraph-form responses. |
| Multiple Choice Question | Presents applicants with multiple answer choices, of which they can choose one. This type of question can also work for True/False, Yes/No, and other binary questions. Applicants can be provided with a box for "Other," where they enter their own answer. |
| Checkboxes Question | These provide applicants with multiple answer choices, of which they can choose one or more. Applicants can be provided with a box for "Other," where they can enter their own answer. |
| Grid Question | Presents applicants with columns and rows, of which they can select one option per row. This type of question can be used to express preferences and which courses the applicant would like to teach.
|
FAQs
Can access to Candidate Forms be restricted?
No. Unlike documents and committee forms, Candidate Forms are always visible to the entire committee. Their visibility settings cannot be modified.
Can candidates save a form and return to complete it later?
Candidates can only return back to a form if all required fields are filled out before leaving the page. As long as the form is in an unlocked section, candidates can return to update those responses. If any required fields are left blank, the candidate’s progress will not be saved.
Can a candidate form response be removed or reset?
No. Once a candidate begins filling out a form, their responses cannot be removed, and the form cannot be reset to a blank state (e.g. radio buttons). However, candidates can edit their responses as long as the form remains in an unlocked section. For radio button questions, answers can be changed but not cleared.
Can an administrator complete a candidate form on their behalf?
No. Only the candidate can complete the candidate forms.
